WELCOME TO PART 3 of our “Extreme Ad Makeover” trilogy, and thanks for sticking with us as we wrap up this tutorial. In Part 1 we showed off the finished product, and then covered some tips, techniques and best practices for preparing the InDesign ad template. Then in Part 2, we deconstructed the InData prototype to show that, in spite of how intimidating all that code might appear, it’s really not all that more complicated than your typical mail merge.
Now we’re going to close the deal (and abandon these real estate analogies for good) by examining the AppleScript that makes this all happen with just a few clicks. To be clear, you don’t need to create an AppleScript to use InData; you simply use InData’s “Import from File…” command and point it to the file containing your data. I mentioned Excel files in Part 2, which you absolutely can use for this purpose; you just need to save them as comma or tab-delimited text first in order for InData to recognize them.
So as long as your data is in the proper format, and your prototype is set up such that the fields that make up your <<fields… statement match the fields in your data—in order—the AppleScript portion of this tutorial is more or less optional. Because our data comes from Google Sheets files, which are saved by the designer as .csv files from the Google Cloud, and because we need to “massage” this data just a tad before importing, I decided to create an AppleScript only so that we could accomplish this all in one fell swoop, as they say.
The highlighted fields at the beginning of the prototype need to match the fields in your data file, in that order. But the field placeholders below can be arranged in any order, and can even be used more than once if need be.
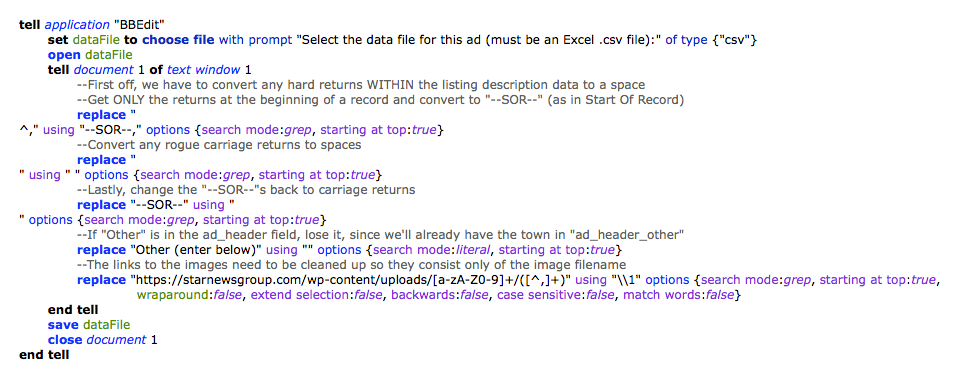
When working with textual data in AppleScript, my go-to program is BBEdit from Bare Bones Software, a very flexible and powerful text editor whose long-time tag line, “It doesn’t suck,” is apparently now a registered trademark. You go, Bare Bones. It’s free to download and—fortunately for us—fully Apple-scriptable. Here’s the chunk of the script that uses BBEdit to do some cleanup chores on the CSV file:
The initial portion of the AppleScript, which uses BBEdit to do some find and replace routines to prep the data file for import into the template via InData.
Even if you’ve never seen an AppleScript before, much less created one, the syntax is pretty straightforward. This portion of the script is simply requesting the data file with the real estate listings, then running some find and replace sequences to get rid of blank lines, remove any paragraph returns that the agents might have entered into the description of the property, and delete the URL part of the property and agent images data, since InData needs only the filename to locate and import images.
OK, you caught me. That last search and replace step uses GREP syntax, which may or may not be familiar to you, but it’s there only because the images for this particular template are uploaded to a folder on the Web when the agency submits them, so the data file ends up including the entire URL for each image. If you’ve never tried to GREP anything (don’t worry, it’s legal in most states nowadays), you can learn more about the syntax here.
In addition to being totally AppleScript-able, BBEdit also happens to be recordable, meaning that you can open a new or existing text file in BBEdit, launch the Script Editor application from your Utilities folder, and then click the red Record button. Anything you do in that document will now be “recorded” in the Script Editor window as scripting commands, and become a working AppleScript. In fact, if memory serves I actually recorded this part of the script, because getting all those GREP options (the purple text in that script step) in place is easier when BBEdit writes them in for you.
What happens in BBEdit (left) is recorded in Script Editor (right) and translated into working AppleScript syntax. Don’t expect to get that kind of service from any other program; BBEdit is, sadly, the only recordable Mac OS X application still standing.
So, in essence, we’re using a script that wrote itself to create an ad that builds itself. Is that not the greatest thing since sliced bread? Or at least the greatest thing since sliced bread got its own Super Bowl commercial, anyway.
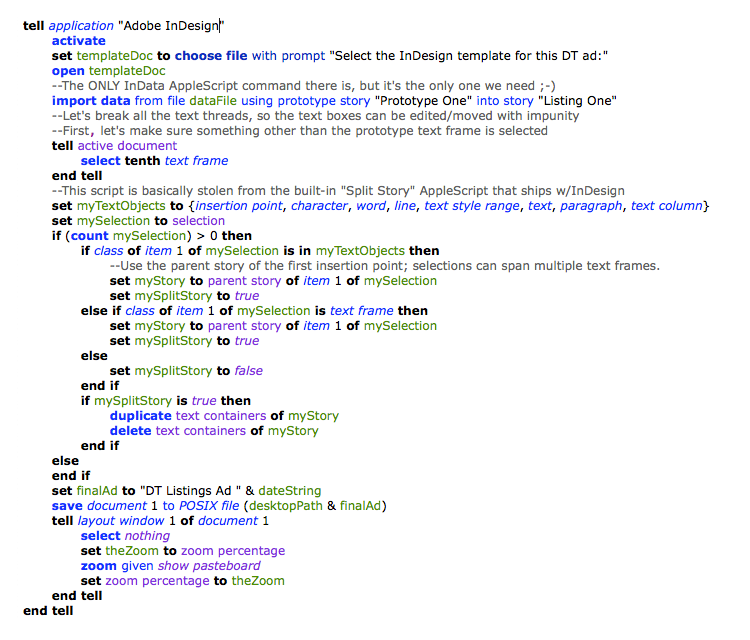
Now that the textual data has been cleaned up, let us proceed to the InDesign portion of our program. Here’s that chunk of the script, which admittedly is a bit longer than the BBEdit part but, again, very straightforward. The template for the ad is requested and opened, followed by a one-line directive that tells InData to import the data from the designated file, using the prototype on the pasteboard and flowing the imported text and images into the threaded text frames beginning with the first one.
As InDesign is not recordable like BBEdit, I actually had to write this one myself. Except for the part that breaks the threaded text frames apart, that came with InDesign. Oh, and the part at the very end that centers the document in the window. But other than that…
Ah, but how does InData know that our prototype is called “Prototype One,” and that the story we need it to start with is “Listing One”? Simple, as InData thoughtfully provides an option for designating the names of both prototypes and text frames (stories). This is found in the InData menu under “Name Story…” I suppose I could have conjured up some more compelling designations for these, but at the time I was simply worn out from writing all those non-recordable script steps.
Moving right along, the script then selects a random text frame (just to ensure that anything but the prototype on the pasteboard is selected) and invokes that “Split Story” script I’ve mentioned in both Parts 1 and 2 of this tutorial. This script actually ships with InDesign, which means I didn’t have to write it or record it, and exists solely to seek out all the threaded text frames and break those threads, so each frame can be dragged around on the layout when the realtor decides the first listing shall be the last, and the last shall be the first, or however that parable goes.
The last few lines name the file and save it to the desktop, then center the page in the window without changing the zoom level. That last little trick comes courtesy of an individual known only as “macgrunt,” who has quite a collection of InDesign scripting hints and tips on his/her Web site. It’s in our script only because I am nothing if not anal-retentive, and I wanted the document to be nicely centered in the window once the script finished.
Well… there it is, as Holy Roman Emperor Joseph II himself might have observed. Let’s sit back and enjoy the entire process from start to finish, including the data cleanup part that BBEdit handles for us. Even with that thrown in, the whole shebang is over almost before you can say “comma-delimited text file.”
It may not be popcorn-worthy, but perhaps this video will inspire you to try automating a similar advertisement—and maybe save a couple hours of your time in the process
And with that, we’re closing the deal on this real estate transaction. While this was by no means an exhaustive step-by-step tutorial, my hope is that you were inspired enough by what was presented here to consider automating an InDesign (or QuarkXPress) document yourself. To give you a head start, here are some useful links for the software and other info to which I’ve referred, along with the complete text of the InData prototype, some sample data, and the AppleScript used herein.
WELCOME TO PART 2 of this three-part case study/tutorial on using Em Software’s InData with Adobe’s InDesign to create an “automated” real estate ad that literally builds itself. Yes, there is some assembly required, but once the InDesign template and the InData prototype are built, it will save you a heckuva lot of time whenever a new ad is created. I’m calling this part ‘The Listings Agent,” since InData serves as the “agent” to create the listings. And because I’ve kinda painted myself into a corner with all these real estate references
As with the first part of this series, I’ll share the final result with you below, just to keep you interested 😉
The Holy Grail of ad production, when you can sit back with your double macchiato and watch the ad build itself.
Last time around, we covered the basic InDesign template setup for this ad, focusing on some best practices that allowed us to set up the automation aspect of this as easily and as consistently as possible. Those included minimizing the number of text frames used, style-sheeting everything in sight, and ensuring the final ad can be manipulated easily when the inevitable changes are requested by the client.
Now, we’ll move on to the actual automation, which is where InData enters the picture. While this plugin is extremely powerful and flexible, you can think of it as, fundamentally, a mail merge utility for InDesign. Well, a mail merge utility on steroids, if you will. When we examine the InData prototype that controls how the incoming text and images are arranged and formatted, it may seem like just a heap of inscrutable computer code. But we’re going to “deconstruct” it, just to prove it’s really not rocket science. Or computer science. Whatevs.
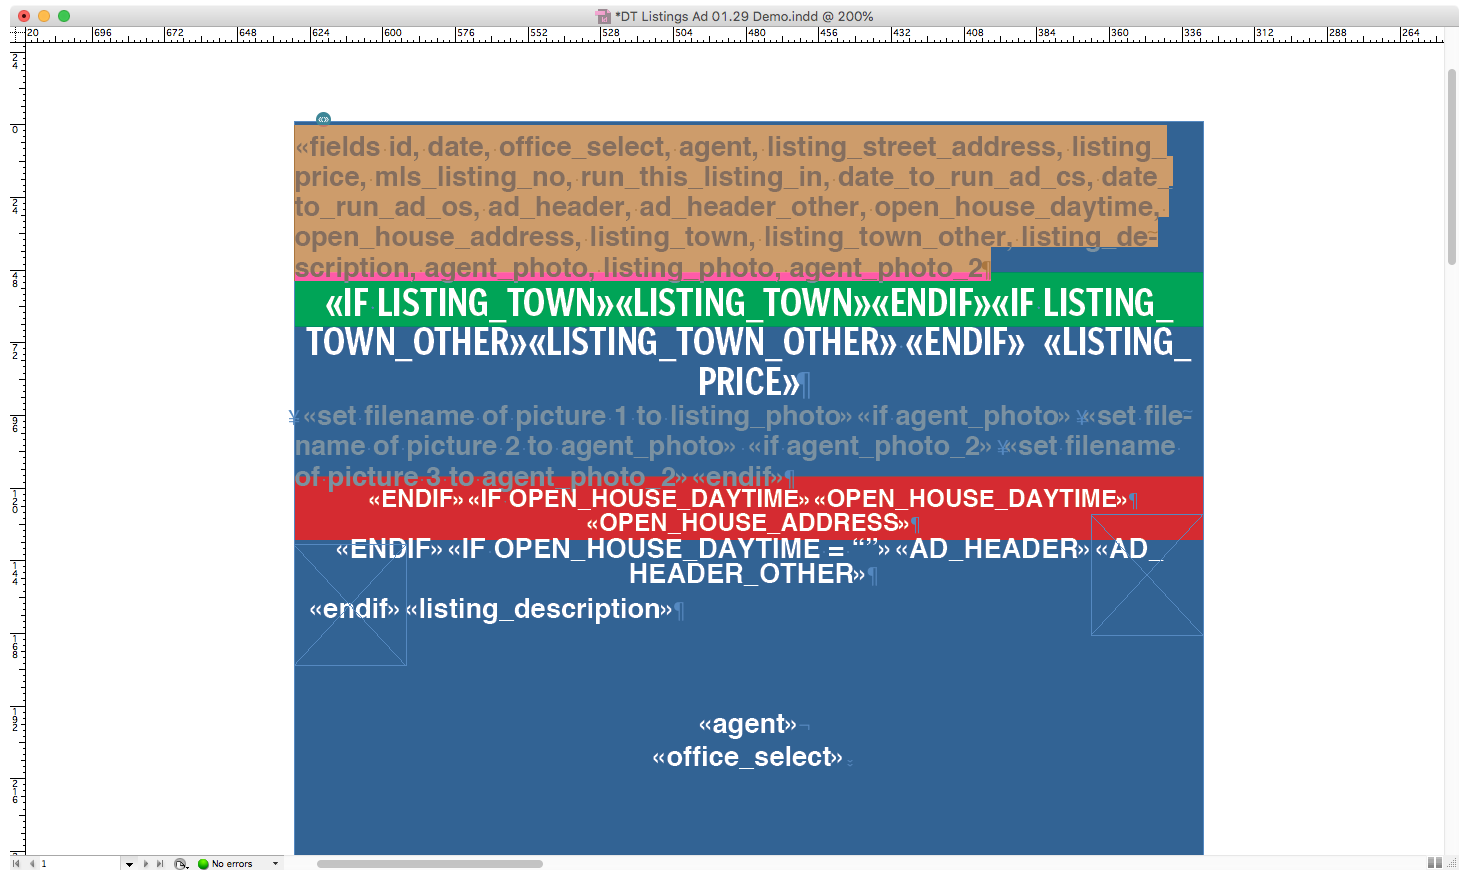
The complete prototype on the pasteboard, showing each field of the incoming data, followed by the style-sheeted elements and the conditional logic wrapped around many of them.
Basically, there are two primary parts to an InData prototype. The first part, beginning with the <<fields text, describes the data that is being imported, while the second part handles the formatting, along with any processing of the data itself (the “if this, then do that” kinda stuff), depending on how sophisticated the prototype needs to be. But all we’re really doing here is specifying which data goes where and in what order, and then applying the appropriate style sheet to each element.
Once this prototype is created, we tell InData where in the template to start flowing in the data; in this case, it’s the first of the sixteen text frames in the template. Each frame is connected with text threads from top left to bottom right, such that the styled text and images flow into each frame in the desired sequence. Once the magic is completed, a “Split Story” script is invoked to break all those threads, allowing us to rearrange any or all of the listing “blocks” in the finished ad more easily.
The template prior to data import. The text threads are a bit hard to make out due to the background, so I’ve identified a couple with arrows for clarity.
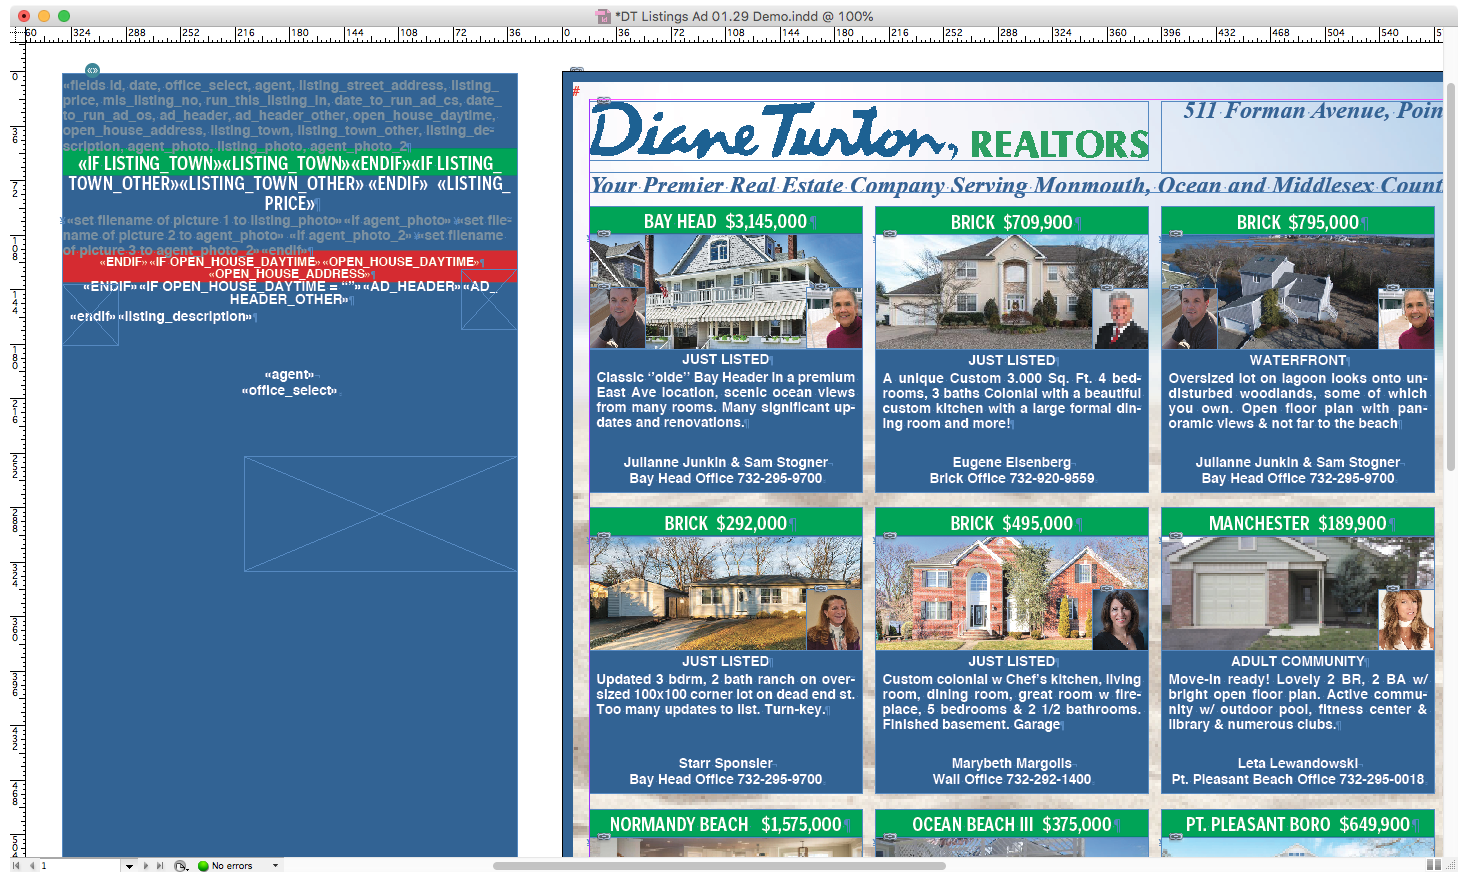
Let’s take a closer look at the actual “code” used in this prototype. I’ve removed all the if/then stuff for the moment, so we can more clearly identify the individual elements. As you can see, it’s simply a matter of applying the appropriate style sheet to the appropriate data, until you’ve covered all the elements included in the ad. The LISTING_TOWN and LISTING_PRICE text have the “Town & Price” style applied, the OPEN_HOUSE_DAYTIME text has the “Open House” styled applied, and so on throughout the prototype.
The Paragraph Styles palette at right shows the style assigned to the Town and Price data, as well as the other style sheets in the template created for each unique element in the listing block.
With the style sheets applied and the data fields arranged in the proper sequence, you can see how each part of the prototype relates to the elements of each listing block. I’ve used arrows to indicate the areas that match up from prototype to listing, although it’s fairly obvious given the colors and styles in this particular template.
In this template, the colors and styles make it pretty easy to see how each part of the prototype relates to each element in the text frame for the listing.
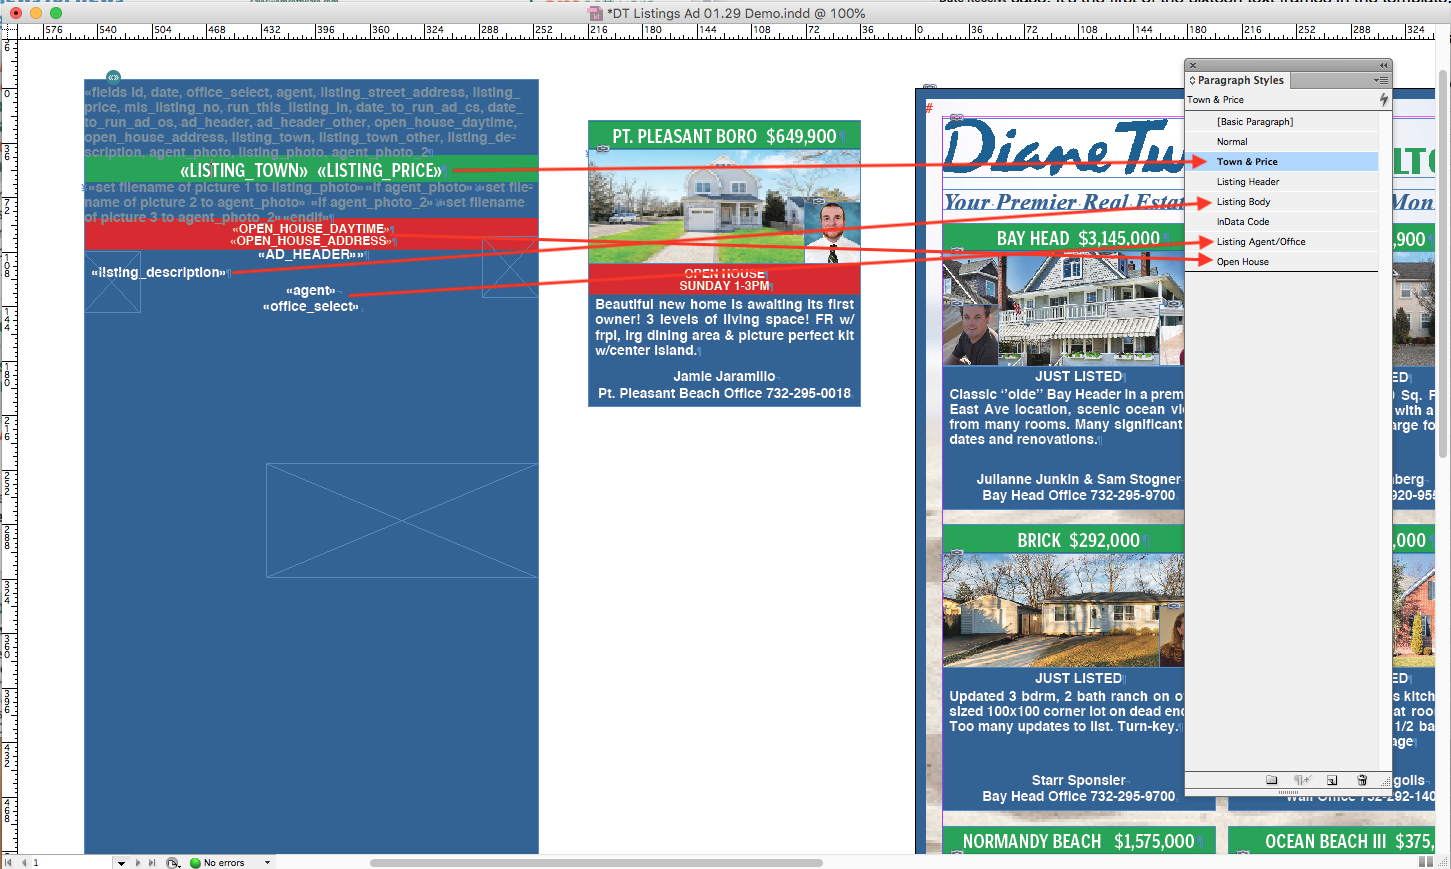
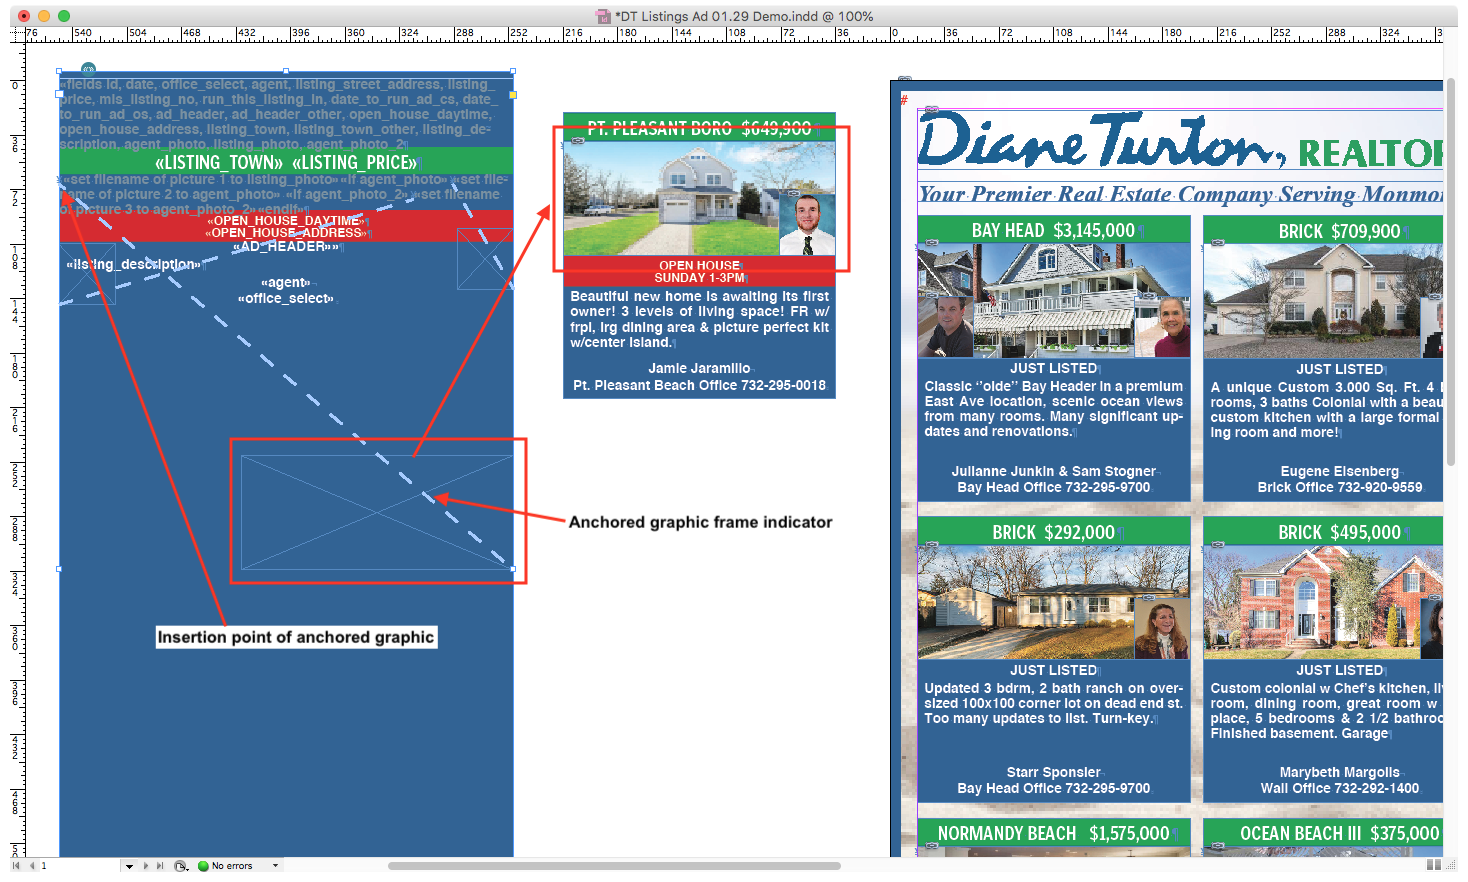
One element of the template I haven’t addressed are the anchored images, which you can see in the prototype as empty graphic frames and thick dotted lines that indicate where the graphics are to appear in the flow of the prototype. It’s hard to see the conditional code that is used to place those, so I’ll include it here in a more legible format:
«set filename of picture 1 to listing_photo»
«if agent_photo»«set filename of picture 2 to agent_photo»
«if agent_photo_2»«set filename of picture 3 to agent_photo_2»
Anchored graphic frames are an essential part of an InData prototype, as they allow the images to flow in with the data and position themselves appropriately. If there is no data for one or both of the agent pictures, the anchored graphic frame simply disappears from the listing, thanks to InData’s conditional logic.
Again, really not all that complicated, right? The first and largest graphic frame in the prototype (“first” meaning where the dotted anchor line starts, not where the box is physically located in the template) is automatically designated as picture 1, so the listing photo is imported into that frame. Then the agent photos—if they are included in the data—are imported into the picture 2 and picture 3 anchored graphic frames respectively; otherwise those are omitted from the listing block entirely.
In case you’re wondering, I’ve nudged the anchored graphic frames in the prototype out of the “flow” where possible, only so that it’s easier to see the code and the logic, so that’s why the frame for the listing photo is way down at the bottom of the prototype. As I noted above, the point where the thick dotted line starts is where the image will be inserted.
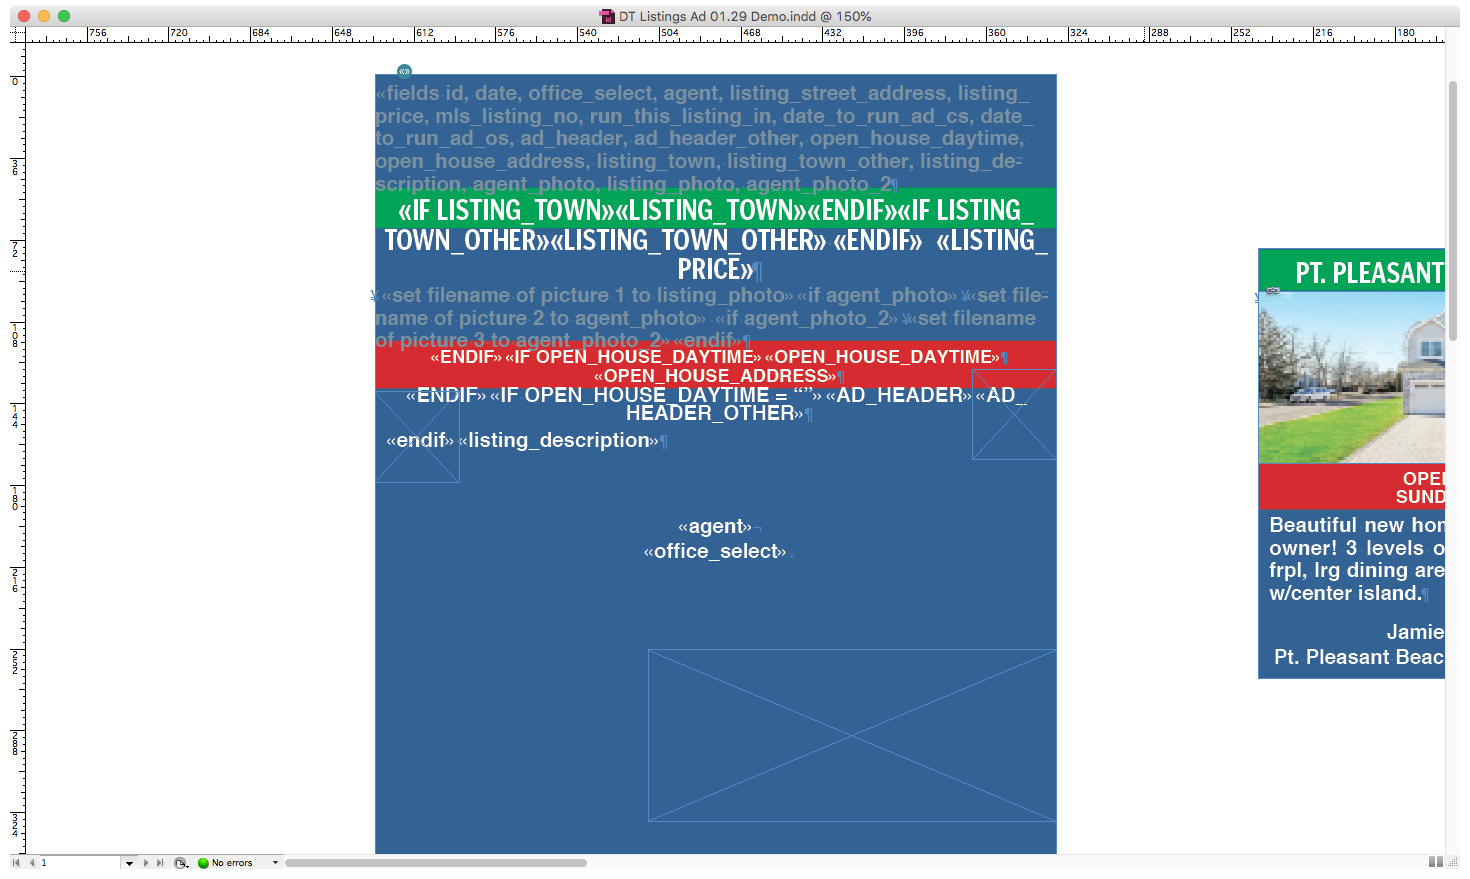
The remainder of the conditional code that I removed for clarity uses the same syntax as the code for the anchored images shown above, wherein you have an “<<if” followed by the name of the field, and then you tell the prototype to include and style that data if it exists; otherwise it gets skipped. I’ve restored the entirety of the prototype code below so you can get a sense of how the rest of the data is handled. For the record, there is a whole lot more that InData can do beyond this basic “if/then” stuff, but I’ll reserve that for a future case study.
The complete prototype code with the conditional statements restored. I’ve zoomed in a bit here so you can see the syntax more clearly. Essentially it’s just a bunch of “ifs” and “endif”s, but no “buts.”
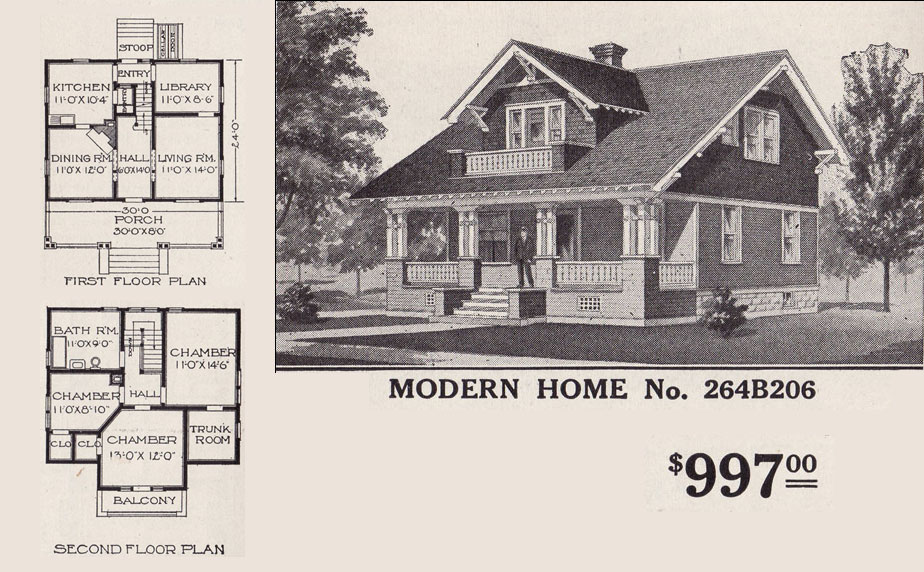
It occurs to me that we’ve spent all this time talking about InData, with nary a word about the data itself. What exactly does this data look like, and where does it come from? Typically it’s nothing more than an Excel spreadsheet, or a simple comma-delimited text file, with the images designated by their filenames so InData knows which ones to import into those anchored frames. Here’s a sample of the data used to create the very first listing in this ad:
1/24/20 11:53,Bay Head Office 732-295-9700,Julianne Junkin & Sam Stogner,512 East Ave,"$3,145,000 ",22003002,The Ocean Star,,"Friday, January 31, 2020",Just Listed,,,,Bay Head,,"Classic ''olde'' Bay Header in a premium East Ave location, scenic ocean views from many rooms. Many significant updates and renovations.",bay-head-512-East-Ave.jpg,agent-Suzanne-Van-Schoick.jpg,agent-sam-stogner.jpg
Simple, right? For this particular ad, I actually rigged up a Web-based form that gets filled out and submitted by the real estate agency for each of their listings. This way, they can’t blame anyone but themselves for typos 😉 The data for each listing gets saved to a Google Sheet, and eventually downloaded to the ad builder’s Mac as a comma-delimited text file. From there, the data gets “fed” to the template via an AppleScript, InData grabs it, and the magic happens.
We’ll cover the building of this script, along with a few other items, and wrap everything up neatly in Part 3, “Closing The Deal.”
ONE OF THE MORE onerous tasks for print designers is building a grid-based ad consisting of multiple products that share the same style and layout. In this example we’re going to look at a typical real estate advertisement built with Adobe’s InDesign, and with an assist from Em Software’s InData plugin, we’ll see how we can change the whole experience from an hours-long copy, paste, style and repeat ordeal to just a few clicks!
The finished ad after being automatically generated via InData, with part of the “prototype” visible at left. We’ll cover how to build and use this prototype in part II of this tutorial.
I’ve called this part “building the foundation” because, well, just like the houses in this ad, you’re probably not going to buy one if there are problems with the foundation. In the same way, we need to create a template for automating the ad creation process that allows us to get consistent results each time, while enabling any last-minute changes from the client to be made quickly and easily.
To do this, we’ll focus on three specific areas:
Rebuilding the individual listing “blocks” with as few text/image boxes as possible. This simplifies things for the building process, as well as for later editing if needed.
Making sure every text element in each listing block has a style sheet assigned, so there are consistent styles across each listing and so that we can make global changes easily.
Allowing the finished listing blocks to be easily draggable around the page, in the event the order of the listings is changed post-creation.
Geez, that sounds like a lot of work, I hear you saying. Sure, it does require some time and effort to configure all this, but remember, folks: You only have to do it ONCE. Nonetheless, I’d hate for any of you to get discouraged right off the bat. So here’s a sneak peek at the end result: a 16-listing real estate ad that literally builds itself in approximately 30 seconds.
Click to see the magic happen. Wouldn’t it be great if you could straighten out your sock drawer like this?
Now that we’ve laid the foundation for the job at hand, let’s get started. Here’s an example of an ad that was assembled manually by taking the previous week’s ad, removing the expired listings while keeping the ones that are still for sale, editing those that remain, and adding entirely new listings. Not only is this a lot of work, but it’s far too easy to remove the wrong listing inadvertently, leave already-sold listings in, key in the wrong price etc.
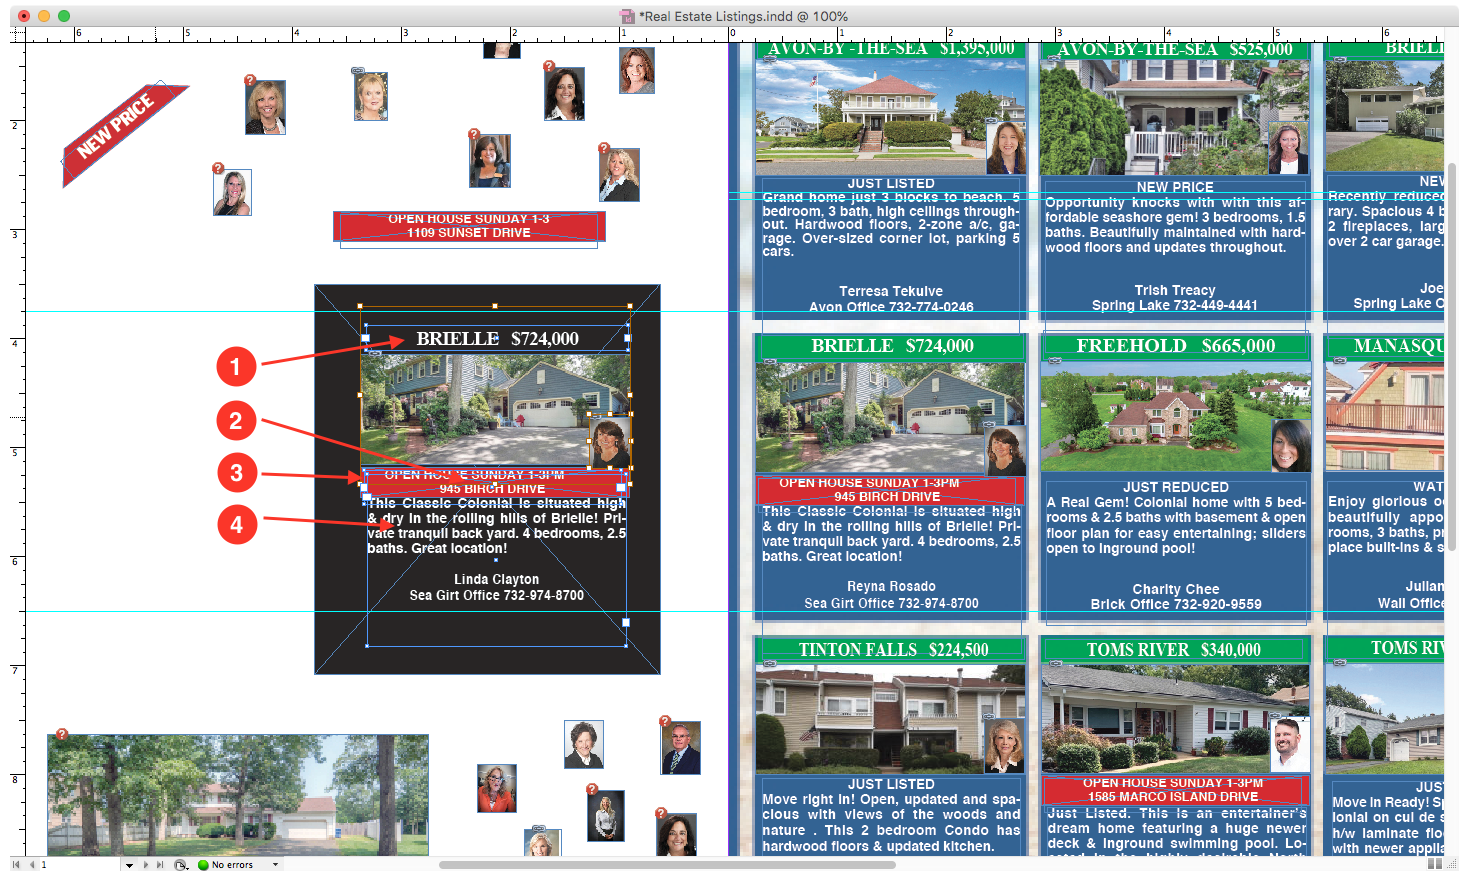
But we’re going to fix all that in short order. Over to the left on the pasteboard, I’ve copied one of the sixteen listing blocks so we can analyze it. You’ll see that this block is made up of three text frames, two image frames and an empty graphic frame to provide the red color behind the OPEN HOUSE header.
Original ad with an example listing block on pasteboard. Three text frames (1, 2 & 4) and one empty graphic frame for color (3), along with the two graphic frames for the images.
Pretty standard, right? And I suppose that’s… OK. But as the world-renowned, leather-clad extraterrestrial mad scientist and Dynamic Tension fanboy Dr. Frank N. Furter once proclaimed:
“OK? OK??? I think we can do BETTER than that!”
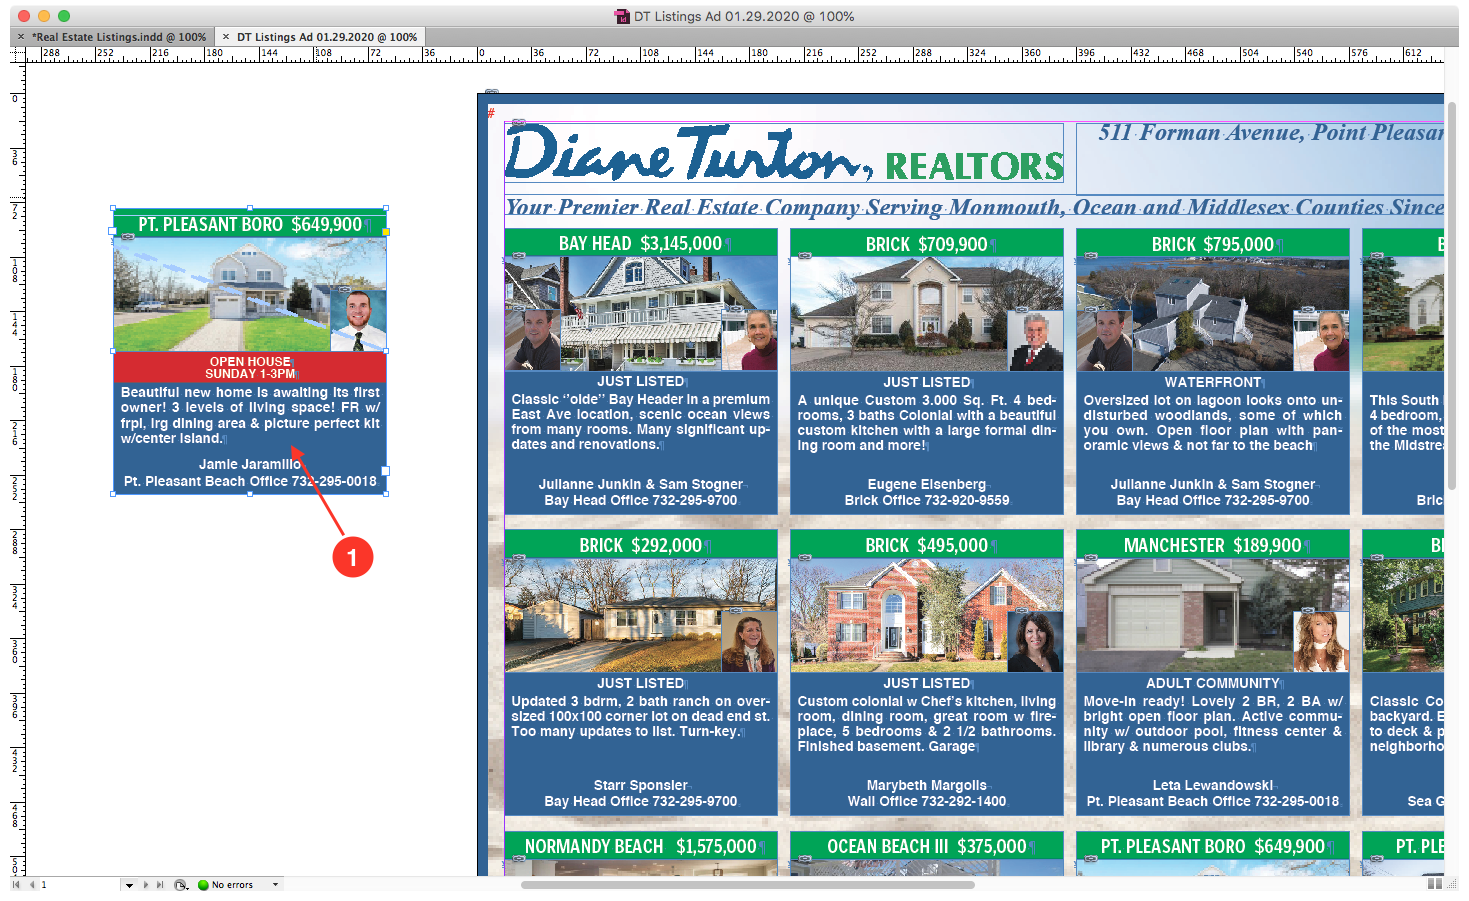
Indeed we can, Frank. Let’s start off by looking at an example listing block from our new and improved, fully-automated ad template, and we’ll see what’s changed. Note that there is only one text frame here, and—as you’ll see as we go through this tutorial—every element in the text frame is assigned a style sheet. This is not only optimal, but necessary for the automation to occur, since when the information for each listing is imported into the template it needs to be assigned a style in order for the “magic” to happen.
Ad created with new template; note single text frame for all text in the listing block.
So how to go from three text frames and a graphic frame to one text frame, without adding in all kinds of hard returns or extra spaces to auto-align text both above and below the images? There are some obvious and some not so obvious methods used here to make this happen (including using anchored images that flow with the text), so let’s examine a few.
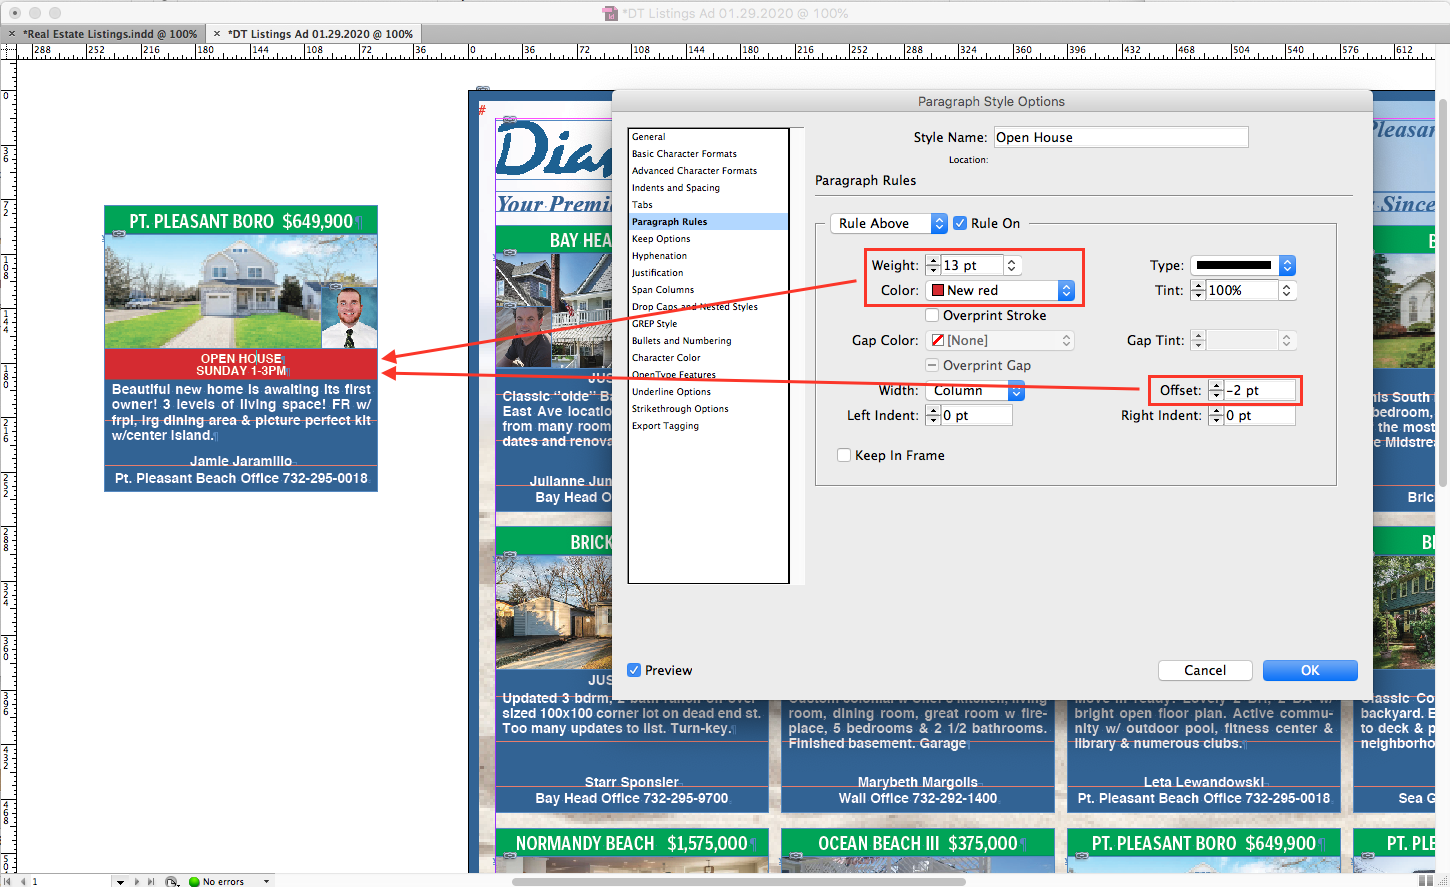
First off, the (single) text frame itself is entirely blue, and in order to create the green and red backgrounds for the town/price and the open house info, paragraph rules with negative offsets are specified in the style sheets for those two elements. This allows the color to flow with the text if needed, and in the case of the Open House header, there’s no need to manually delete any red graphic or text box if no open house is scheduled, as that text simply will not appear. Note that if you’re using a more recent version of InDesign than we’ve employed here, you can get the same results in fewer steps via the Paragraph Shading feature, instead of using our “Rule Above” workaround.
Paragraph rules for the OPEN HOUSE section create the red background without using an additional empty colored graphic frame.
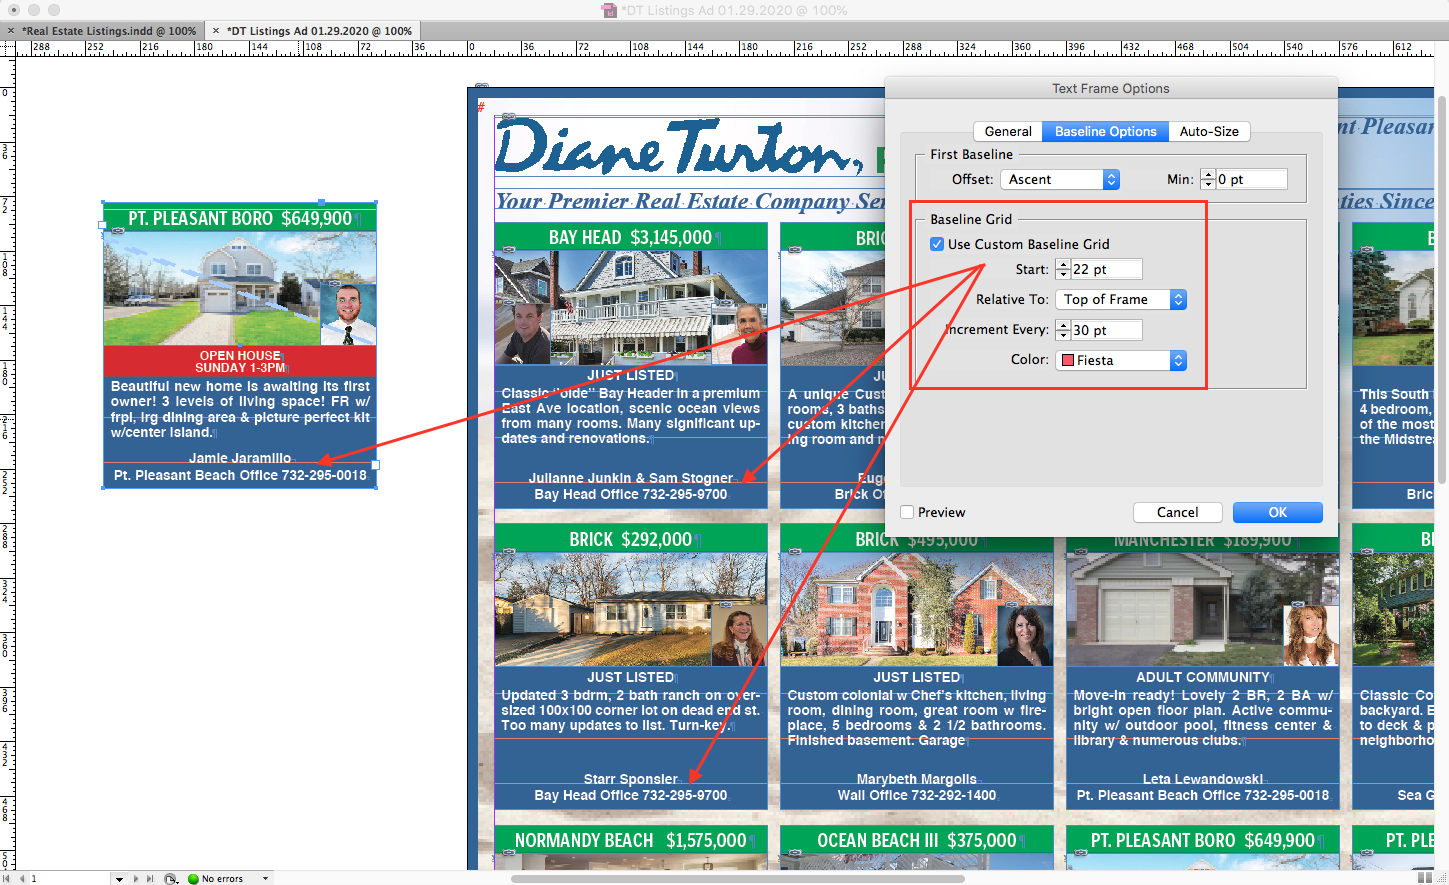
Another technique in use here that may not be obvious is how the agent and office text is aligned within the text frame; in this case, the frame itself has a baseline grid enabled, and the style sheet for this text only is set to align to this grid. That causes the agent name and the office info to “stick” to the bottom of the frame, regardless of how deep the text above it is. While baseline grids are frequently employed on an entire page in publication templates, the ability to use a baseline grid within a specific text frame provides some very powerful options for lining things up automatically.
A baseline grid set within the text frame itself allows the agent/office text to auto-align at the bottom of each listing block.
The third area we’re focusing on is the ability to easily move these blocks around the page once the text and images have been “flowed” in. You may have noticed in the video above that all 16 text frames are threaded together from left to right, and top to bottom. This works great for creating the listings programmatically, but not so great if we want to rearrange them later on. If you’ve every tried to drag threaded text frames around a page without disrupting the flow or causing text to jump between frames, you know exactly what we mean.
So in this case, we’ve taken advantage of a script already built-in to InDesign’s Scripts palette called “SplitStory.applescript” which, as its name implies, breaks all the threads between selected text frames on a page while keeping the content within each frame intact. I like to think of this as the “What happens in text frames, stays in text frames” script. Once that’s run, any or all of the listings blocks can be moved about with impunity.
InDesign’s built-in Split Story script “unthreads” all the threaded text frames for us, while keeping the contents of each text frame intact.
Depending on the type of document you may be automating, not all of these style sheet settings may be necessary. Regardless, it’s always good to follow a few simple guidelines when it comes to creating an InDesign template that will be used in an automated workflow:
Try to use as few text frames as possible to minimize the complexity of the document. Since you will most likely be threading frames together, you want to keep the number of threads to a minimum. Using the original layout, we would have had three threaded frames in each block plus the threads connecting the sixteen blocks together on the page, so that’s 64 threads and a while bunch of text frames to manage.
Avoid using additional frames as backgrounds to color a text frame; either color the text frame itself and set inset values for all four sides so the text floats within the frame, or use paragraph rules that are at least as deep as the text size to provide color.
Create style sheets for every text element that has a unique set of specs. Not only will that make it easier for you to work with the document when you get to the “automating” part, but anyone else who might use your template will thank you for it when they can globally change the point size, or maybe the paragraph space after, of a particular element via the style sheets that you’ve (thoughtfully) created.
Whew! That’s a lot for one tutorial. Let’s take a break here, and when you’re ready you can move on to part 2, “The Listings Agent,” where we’ll see how to use InData to create the listings automatically via a custom “prototype” that tells it exactly how the listing blocks should be styled and arranged on the page.
New Jersey-based Star News Group (SNG) publishes two weekly newspapers, The Coast Star and The Ocean Star, with a combined paid circulation of approximately 18,000, as well as the bi-weekly, ad-supported Night & Day entertainment guide. These publications serve the greater Monmouth and Ocean County, NJ area.
The folks at SNG have no illusions about how much the newspaper business has changed over the last 10-15 years. For them, containing costs isn’t just a smart strategy; it’s a virtual necessity for long-term survival.
Having provided tech support and consulting services to them for quite a few years now, my recent focus has been on enhancing their editorial and production workflow while reducing costs. One area that seemed ripe for improvement was the tech stack for their reporters, with each one provided a full QuarkXPress license and a Mac desktop (with the requisite memory upgrades, hundreds of fonts, etc.) for creating editorial content.
I felt that if the dozen or so reporters could be transitioned to content creation via some type of publishing system linked to the layout and production team, SNG could save a ton of money on the Quark licensing fees and on Mac purchases. But industry-standard publishing systems like Adobe’s InCopy or Quark’s QPS entail their own significant costs, require training for all personnel involved, and are still relatively demanding when it comes to hardware.
That’s where Em Software’s DocsFlow enters the picture. Because I’d moved SNG’s email services from a local Internet provider to what was then known as Google Apps (now the “legacy free edition” of GSuite), at a time when it was available to unlimited users at no cost, every SNG employee has 15GB of email and Google Drive storage with no monthly user fees.
So, instead of renewing their enterprise Quark license, I convinced them to purchase a half-dozen licenses for DocsFlow—at a fraction of the QuarkXPress licensing cost—and begin creating all their editorial content in Google Docs (again, free to all their users), with each story linked back to InDesign pages assembled in the Production department. Because SNG had a handful of Creative Suite licenses for their artists (primarily for Adobe Photoshop), they were able to move from Quark to InDesign for page layout at no additional cost.
On the right, the story as viewed and edited in Google Docs. On the left, the doc “flowed” into InDesign, auto-magically styled by matching Google Docs styles to InDesign’s style sheets.
Once the reporters were all onboarded with Google Docs (which took all of about ten minutes for most), they discovered that they were able to collaborate in real time with their editors, track changes easily and reliably, create and edit articles on any device that can access Google Drive, and completely avoid the need to master the idiosyncrasies of a page layout program like QuarkXPress.
On the production side of things, the Google Docs articles authored by the reporters are imported to InDesign fully or nearly-fully styled, thanks to DocsFlow’s ability to map the standard Google Docs styles to InDesign styles in the page templates. Because DocsFlow maintains a live link to each Google Doc after it’s placed in InDesign, reporters can continue to make textual changes in the Google Doc, with those edits reflected on the InDesign side.
But wait—it gets better. With reporters now able to author entirely in Google Docs, and DocsFlow handling the transfer of their content to the production department and InDesign, there was no longer a need to provide them with a pricey Mac desktop or laptop. So SNG is currently swapping those out with sub-$200 Chromebooks, repurposing some of the Macs and selling off others on eBay. Which means they’ll not only fully recover the cost of acquiring the Chromebooks, but realize a tidy profit as well.
In the final analysis, SNG expects to save thousands of dollars this year as a result of this switch, while enjoying a more streamlined and efficient editorial workflow. For any publication facing the combination of shrinking print ad revenues and increasing costs, there’s another combination that’s worth considering—that of Google Docs, Adobe InDesign and Em Software’s DocsFlow.
In the immortal words of the late, great Sam Cooke: “Ain’t that good news? Man, ain’t that news?”
BURIED DEEP within the (Touch ID &) Passcode settings on our iPhones is a toggle switch that reads simply: “Erase Data.” Below this switch, a small block of help text adds the following explanation: “Erase all data on this iPhone after 10 failed passcode attempts.”
This tiny toggle, and those ten attempts, are at the heart of the current dispute between Apple and the FBI as regards a particular iPhone 5c used by one of the attackers in the recent San Bernardino shootings.
There are already a lot of words being bandied to and fro regarding this matter, and numerous notables have already taken sides (see Donald Trump’s; see the EFF’s). My purpose here is not to state my own position and the arguments appertaining thereto; rather, I’d prefer to assist in the general understanding of what it is precisely that the FBI wants, and what Apple does not.
BECAUSE THE iPhone in question may have been set to erase all its data after 10 failed password attempts, FBI investigators are unwilling to attempt their ten best guesses at the login and thereby lose any information that may yet be on the phone, as there is no way to know whether the “Erase Data” switch was enabled or not.
Apple chose to protect a dead ISIS terrorist’s privacy over the security of the American people. It’s unfortunate that the great company Apple is becoming the company of choice for terrorists, drug dealers, and sexual predators of all sorts.
Of course, the agents could simply break open the iPhone and remove its hard drive, but the data on that drive is encrypted in such a way that no one at Apple—or anywhere else—could unscramble it. And once the iPhone wipes the data after 10 unsuccessful password attempts, that information is also beyond recovery by mere mortals.
Therefore, the FBI’s legal team is employing a relatively obscure 1789 statute known as the All Writs Act to compel Apple to engineer a “back door” which can override this protection setting, and allow the data erasure to be prevented. By doing so, law enforcement IT personnel can then employ a computer program to enter tens of thousands of passwords into the phone in rapid succession until it’s unlocked.
IF THE PASSCODE were set to four digits, which allows for a meagre 10,000 possible combinations, the phone could be accessed in a matter of minutes. If there are six or more digits used, it would take the computer program a tad longer, but not much.
The FBI’s position on all this is that they are making this request for only this particular phone in this particular instance, and that no changes to Apple’s hardware or software are needed. In essence, they are asking Apple to build a tool for them that would allow them to circumvent the Erase Data option on this particular passcode-locked iPhone 5c running iOS 7, and nothing more.
Apple, for their part, is reluctant to willingly construct a back door that would allow any of their devices to be broken into. To that end, Tim Cook has penned a rather eloquent missive to the public at large, in which he states Apple’s position and the reasons for said position, with a particular emphasis on why he feels this carries the potential to do more harm than good.
One of the great challenges with which all this amazing new technology confronts us is how to strike that delicate balance between personal privacy and the safety of our own data, versus the need to monitor threats and prevent terrorist attacks before they happen, as well as to access information after the fact that may reveal motives, accessories etc.
This will not be the last horrific event whose possible resolution could be on a smart phone. There will be many government agencies that many times in the future, point to Apple’s compliance as a precedent. Once this happens, we all roll down that slippery slope of lost privacy together.
However you may feel about it, this goes far beyond a legal dispute between Apple and the FBI; the eventual resolution of this battle will impact not only technology in general but our government and society as well.
SHOULD ANY of you feel the urge to share your feelings about this issue, from any perspective whatsoever, you are most welcome to share them here. There is no “wrong” answer to this, nor are there any “wrong” positions that can be taken. There is already, however, more than enough knee-jerk reaction flying about, so I’m just trying my best here to keep that to a minimum.
THAT’S MY PET NAME for the newly-arrived Mac OS X 10.11 (aka “El Capitan”), given how one is virtually bludgeoned into upgrading with incessant App Store notifications. Even as cautious an early adopter as I took the plunge the day 10.11 was released, but only because 1) I was curious to test Apple’s assessment of this upgrade being a straightforward “tune-up” and unlikely to cause any serious heartache for those choosing to live on the bleeding edge of Mac OSs, and 2) I was fully Time-Machined in the event of disaster.
To my surprise, life after Yosemite has been markedly uneventful, to the point where I’ve had to set my desktop to the default El Capitan image to remind me that I’m no longer working in Yosemite. Then again, the new features are so underwhelming this time around that your everyday computing experience will be little changed; the most compelling new feature could be the ability to locate a “lost” cursor by shaking your mouse to temporarily enlarge the pointer. Seriously.
Yes, the Notes app has been upgraded with to-do lists and the ability to attach an image or link, and Safari now has pinned tabs, although its implementation is somewhat flawed when compared to the Chrome browser, which has had this feature for ages (in computer terms, anyway). Beyond that, toss in some increased performance and stability, a few Spotlight improvements and the ability to sort albums in Photos by something other than the title of the image, and that pretty much covers it.
NOW WE KNOW why Apple kept virtually mum about El Capitan at their September 9 event. Fact is, I had planned on devoting a lot of keystrokes to the OS X 10.11 experience, but I think that about covers it. Other than, of course, whether you should take the plunge yourself at this point.
Here’s my advice, for what it’s worth. If you have not already done so, wait for OS X 10.11.1, which should be arriving in a month or so. That will give Microsoft and Apple time to work out the Office 2011/2016 crashing issues, in particular with the Outlook mail app (which hopefully none of you are forced to use), and address the most egregious bugs that a few users have reported.
Now, on to more compelling stuff:
Only a few feathers short (for now)
There’s no danger anyone’s going to make a verb out of using it (“just DuckDuckGo it”?), but even Google might be more than a little concerned about the upstart search engine DuckDuckGo, The Search Engine That Doesn’t Track You, as its landing page proclaims proudly.
Right from the get-go, DDG was on a mission to not profile its users, and prides itself on not altering its search results based on what it knows about the searcher, practices in which Google has been actively engaged since at least 2009.
DuckDuckGo uses data from Wikipedia and from other search engines like Yahoo! and Bing (with their consent), so it’s not as thorough or accurate as Google, and lacks some of the higher-end features like the search giant’s Knowledge Graph, currency conversions and other calculations, flight info, etc. It can, however, perform a few nifty tricks that Google can’t.
But the real lure of DDG is that it provides uniform results to all; in fact, that’s all it can do because it doesn’t track your browsing history, and therefore has nothing to go on when it comes to custom-tailoring your search results. Should you find yourself so inclined to Google “how can I stop Google from tracking me on the web,” you’ll notice more than a few references to DuckDuckGo.
Thanks to its emphasis on personal privacy, DDG suddenly found itself on a relatively level playing field last year when Apple added DuckDuckGo to Safari (and Mobile Safari) as an optional search engine in September 2014. Mozilla (Firefox) followed suit soon after. Tip: Don’t hold your breath waiting for the Google Chrome browser to add DDG (although a Chrome extension for DuckDuckGo does exist).
Is it worth taking a flyer on this upstart search site? I’ll let you folks decide. On your Mac, go to Safari–>Preferences–>Search to set DuckDuckGo as the default search engine; for your iDevice(s) it’s Settings–>Safari–>Search Engine. Who knows? Maybe you’ll find that Google just isn’t all it’s quacked up to be, and should that be the case, DuckDuckGo might just… fit the bill.
More, more, more
DID ANDREA TRUE’S 1976 disco classic predict Apple’s own October surprise of last week, what with the wizards of Cupertino announcing more, more, more new gizmos only a month after September’s iPhones, iPads, Pencils and Smart Keyboard?
OK, probably not, although given that the history of this tune involves a porn actress, former Jamaican prime minister (and Castro sympathizer) Michael Manley, and a 2011 Honey Bunches of Oats commercial, I couldn’t resist conjuring one of my usual tortured references here. But honestly, I suspect “more, more, more” most appropriately describes the amount of cash you’ll need to get your hands on any of these gadgets:
Peripheral
Magic Mouse–> Magic Mouse 2
Wireless Keyboard–> Magic Keyboard
Magic Trackpad–> Magic Trackpad 2
Was
$69
$69
$69
Now
$79
$99
$129
Which is…
More,
More,
More…
The Magic Trackpad has Apple’s new Force Touch and a larger surface area, the Magic Mouse 2 is lighter with fewer moving parts, and the Magic Keyboard is… well, it’s the Magic Keyboard and not the Magic Keyboard 2, because the previous model was technically known as the Apple Wireless Keyboard, as opposed to the Magic Keyboard. This new one has, uh, keys and a spacebar and stuff. And now, it’s officially magic.
These pricey new peripherals finally(!) do away with the need to keep a stockpile of AAs at the ready, since all three use lithium-ion batteries that reportedly charge fully in just a few hours via a Lightning to USB cable (included), while squeezing about a month of average use from a single charge.
Before you decide to experience all this magic for yourself, you should know all three of these doodads require you to be running the brand spanking new OS X 10.11 El Capitan operating system on your Mac of choice. Furthermore, that Mac must be Bluetooth 4.0 capable (meaning 2012 or newer models, give or take a few months).
What’s that, you say? You’re saddled with the virtually prehistoric “mid-2011” iMac? Or perhaps an Industrial Revolution-era “late 2011” MacBook Pro? No worries, Apple’s got your back with—what else—more iMacs, with more pixels, for more money! The new 21.5” 4K “Retina” iMac, at $1499 ($400 more than the previous model) has four times more pixels (~9.4 million; 4096 x 2304) than its $1099 cousin (a paltry 2 million or so).
Still not enough pixels for you? The $1799 27” 5K iMac’s display offers a staggering 14.7 million pixels (5120 x 2880), which, at a mere $0.0012 per pixel, just might qualify as the bargain of the century. To say nothing of the fact that you get a “free” Magic Mouse 2, Magic Keyboard and Lightning to USB charging cable in the box!
Need I say more… more… more?
The password is… not?
AND NOW, HERE’S some wonderful news for those of us whose “things I really, really hate a lot” lists read something like this:
Assuming your #1-#4 are similar if not identical to mine, Yahoo! is coming to your rescue here, with a radical new authentication option for Yahoo! Mail they call Yahoo! Account Key. I’ll spare you the technological mumbo-jumbo about two-factor authentication and get right down to the nitty gritty: Account Key enables you to log into your Yahoo! email in a Web browser just by receiving a notification on your mobile phone and touching “OK.” No fuss, no muss—and no password!
Is it secure? Yes. Is it easy to set up? Yes. Does it work for anything else besides Yahoo? No. Not yet, anyway. But the hope is that others (Apple, Google, etc.) will soon follow suit. The predecessor of Yahoo Account Key, the aforementioned two-factor authentication (2FA), requires that you enter a password and a temporary PIN code, typically supplied by a notification or SMS (text) message on your cellphone.
YOU CAN USE 2FA right now with your Apple ID, Gmail and a host of other services, but most of us would prefer to make it easier to access our online properties, as opposed to harder—even if setting up and using 2FA does make things quite a bit more secure than passwords alone. And if you don’t have a mobile phone, well, then it’s time to start learning the ins and outs of your password manager of choice.
NO, I’M NOT REFERRING to that kind of October surprise; we’ll have to wait a year or so to see what may be lying in wait—and for whom—in the weeks leading up to the 2016 presidential election. I’m talking about a very gratifying surprise for me personally, which just happened to occur on October 10 when I completed a 60-mile bike ride from Piscataway to Ortley Beach with relative ease, and with no ill effects.
I’d done this annual “Tour de Shore” ride at least a dozen times since the 1990s, but was forced to place myself firmly within the “maybe next year” category ever since a July surprise of 2011, when a routine blood test showed I had virtually no platelets. That was followed by a diagnosis of acute myeloblastic leukemia one year later, and finally by a Halloween 2012 stem cell transplant.
Due to the aftereffects of the chemo regimens, and the chronic graft vs. host issues that followed the transplant, I had become pretty much resigned to the idea that I should feel blessed merely to be able to make it from the bedroom to the living room without passing out, and set aside even the slightest notion whatsoever of engaging in any long-distance cycling activity.
BUT MODERN MEDICINE seems to have no shortage of miracles these days, and I’m happy to report that since then my overall health and vigor have gradually returned, particularly over the past year, defying my own assumptions that I’d “plateau” at the point where I could perhaps manage a walk around the block, but little more. Cycling, on the other hand, would be an activity heretofore banished to the “things I used to do before the transplant” category.
That’s why completing this year’s ride really did come as a surprise to me, especially given that I truly was not physically capable of completing it only a year ago. This time around, in spite of being a full year older, I felt I could have endured even a few more miles at the end of the ride.
What’s also been surprising to me—though it probably shouldn’t be—is the degree of support and good wishes I’ve received from so many of you since this whole ordeal began. So thanks again to family, friends and all of you out there for your positive thoughts and your encouragement along the way.