

The Listings Agent
WELCOME TO PART 2 of this three-part case study/tutorial on using Em Software’s InData with Adobe’s InDesign to create an “automated” real estate ad that literally builds itself. Yes, there is some assembly required, but once the InDesign template and the InData prototype are built, it will save you a heckuva lot of time whenever a new ad is created. I’m calling this part ‘The Listings Agent,” since InData serves as the “agent” to create the listings. And because I’ve kinda painted myself into a corner with all these real estate references
As with the first part of this series, I’ll share the final result with you below, just to keep you interested 😉
Last time around, we covered the basic InDesign template setup for this ad, focusing on some best practices that allowed us to set up the automation aspect of this as easily and as consistently as possible. Those included minimizing the number of text frames used, style-sheeting everything in sight, and ensuring the final ad can be manipulated easily when the inevitable changes are requested by the client.
Now, we’ll move on to the actual automation, which is where InData enters the picture. While this plugin is extremely powerful and flexible, you can think of it as, fundamentally, a mail merge utility for InDesign. Well, a mail merge utility on steroids, if you will. When we examine the InData prototype that controls how the incoming text and images are arranged and formatted, it may seem like just a heap of inscrutable computer code. But we’re going to “deconstruct” it, just to prove it’s really not rocket science. Or computer science. Whatevs.

Basically, there are two primary parts to an InData prototype. The first part, beginning with the <<fields text, describes the data that is being imported, while the second part handles the formatting, along with any processing of the data itself (the “if this, then do that” kinda stuff), depending on how sophisticated the prototype needs to be. But all we’re really doing here is specifying which data goes where and in what order, and then applying the appropriate style sheet to each element.
Once this prototype is created, we tell InData where in the template to start flowing in the data; in this case, it’s the first of the sixteen text frames in the template. Each frame is connected with text threads from top left to bottom right, such that the styled text and images flow into each frame in the desired sequence. Once the magic is completed, a “Split Story” script is invoked to break all those threads, allowing us to rearrange any or all of the listing “blocks” in the finished ad more easily.

Let’s take a closer look at the actual “code” used in this prototype. I’ve removed all the if/then stuff for the moment, so we can more clearly identify the individual elements. As you can see, it’s simply a matter of applying the appropriate style sheet to the appropriate data, until you’ve covered all the elements included in the ad. The LISTING_TOWN and LISTING_PRICE text have the “Town & Price” style applied, the OPEN_HOUSE_DAYTIME text has the “Open House” styled applied, and so on throughout the prototype.
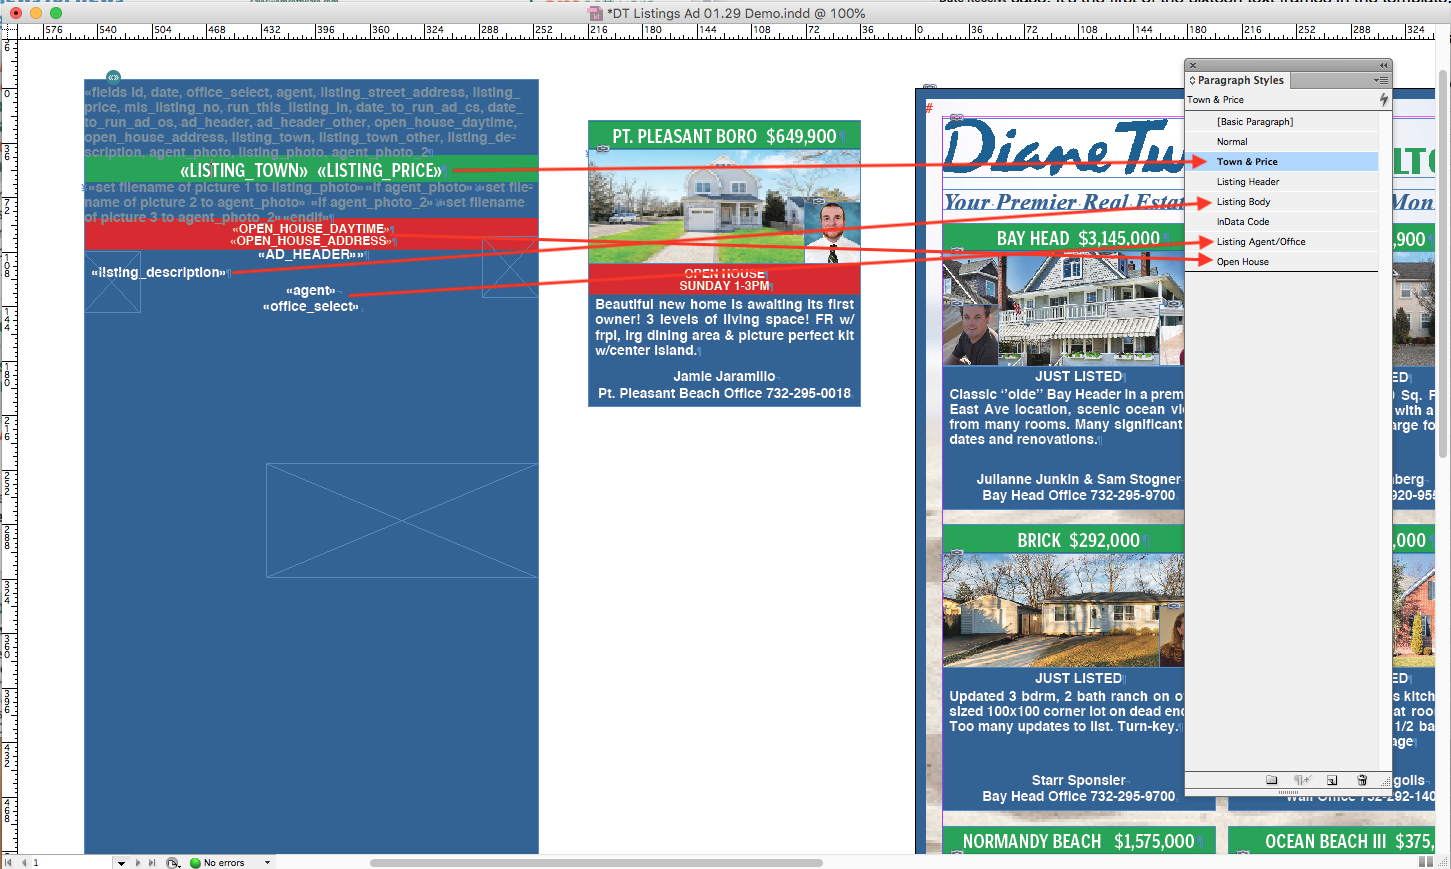
With the style sheets applied and the data fields arranged in the proper sequence, you can see how each part of the prototype relates to the elements of each listing block. I’ve used arrows to indicate the areas that match up from prototype to listing, although it’s fairly obvious given the colors and styles in this particular template.

One element of the template I haven’t addressed are the anchored images, which you can see in the prototype as empty graphic frames and thick dotted lines that indicate where the graphics are to appear in the flow of the prototype. It’s hard to see the conditional code that is used to place those, so I’ll include it here in a more legible format:
«set filename of picture 1 to listing_photo»
«if agent_photo»«set filename of picture 2 to agent_photo»
«if agent_photo_2»«set filename of picture 3 to agent_photo_2»

Again, really not all that complicated, right? The first and largest graphic frame in the prototype (“first” meaning where the dotted anchor line starts, not where the box is physically located in the template) is automatically designated as picture 1, so the listing photo is imported into that frame. Then the agent photos—if they are included in the data—are imported into the picture 2 and picture 3 anchored graphic frames respectively; otherwise those are omitted from the listing block entirely.
In case you’re wondering, I’ve nudged the anchored graphic frames in the prototype out of the “flow” where possible, only so that it’s easier to see the code and the logic, so that’s why the frame for the listing photo is way down at the bottom of the prototype. As I noted above, the point where the thick dotted line starts is where the image will be inserted.
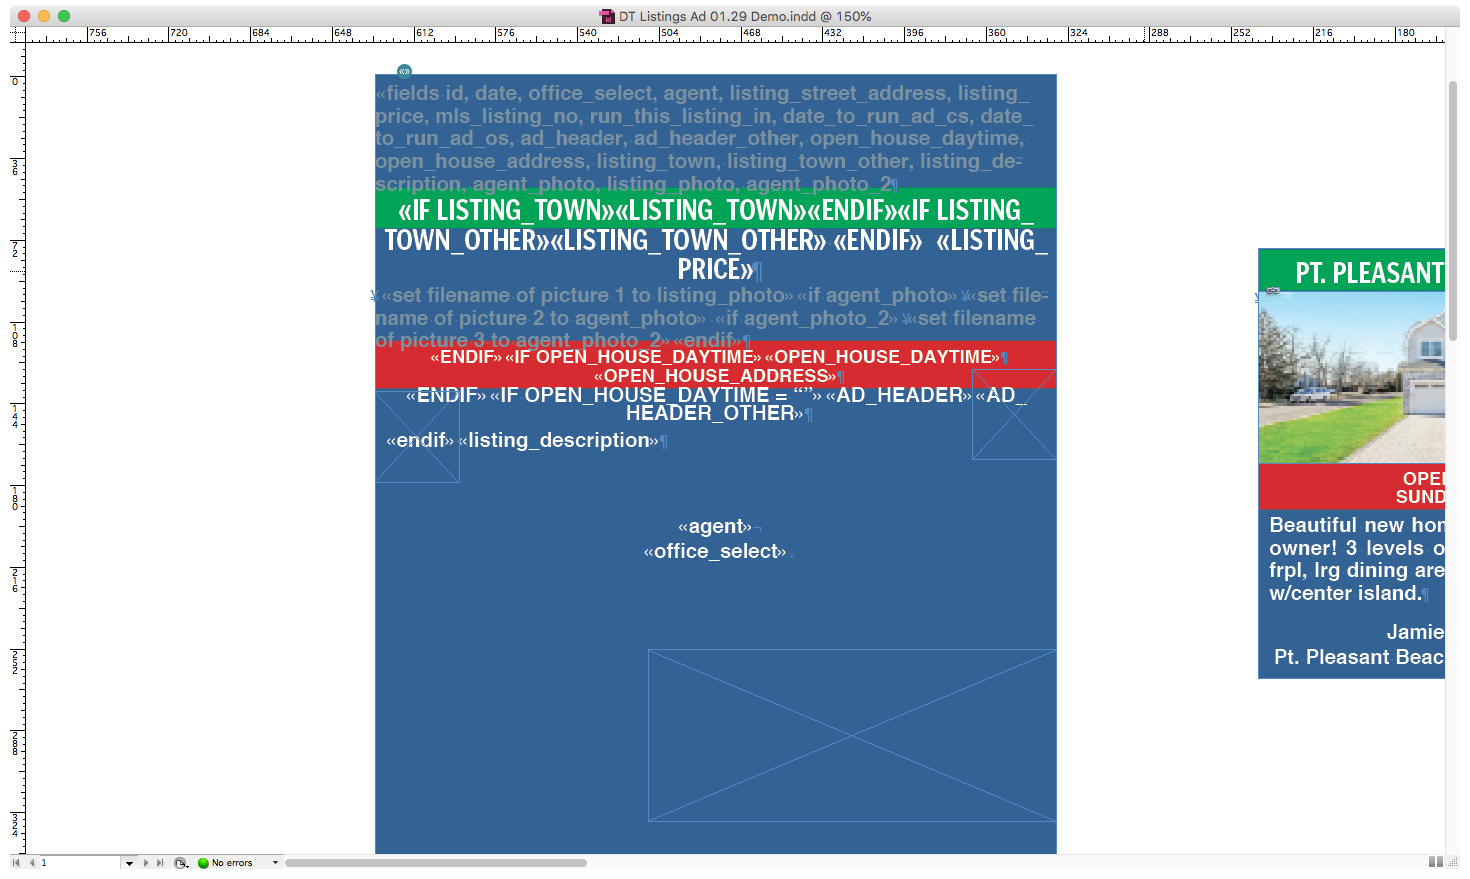
The remainder of the conditional code that I removed for clarity uses the same syntax as the code for the anchored images shown above, wherein you have an “<<if” followed by the name of the field, and then you tell the prototype to include and style that data if it exists; otherwise it gets skipped. I’ve restored the entirety of the prototype code below so you can get a sense of how the rest of the data is handled. For the record, there is a whole lot more that InData can do beyond this basic “if/then” stuff, but I’ll reserve that for a future case study.
It occurs to me that we’ve spent all this time talking about InData, with nary a word about the data itself. What exactly does this data look like, and where does it come from? Typically it’s nothing more than an Excel spreadsheet, or a simple comma-delimited text file, with the images designated by their filenames so InData knows which ones to import into those anchored frames. Here’s a sample of the data used to create the very first listing in this ad:
1/24/20 11:53,Bay Head Office 732-295-9700,Julianne Junkin & Sam Stogner,512 East Ave,"$3,145,000 ",22003002,The Ocean Star,,"Friday, January 31, 2020",Just Listed,,,,Bay Head,,"Classic ''olde'' Bay Header in a premium East Ave location, scenic ocean views from many rooms. Many significant updates and renovations.",bay-head-512-East-Ave.jpg,agent-Suzanne-Van-Schoick.jpg,agent-sam-stogner.jpg
Simple, right? For this particular ad, I actually rigged up a Web-based form that gets filled out and submitted by the real estate agency for each of their listings. This way, they can’t blame anyone but themselves for typos 😉 The data for each listing gets saved to a Google Sheet, and eventually downloaded to the ad builder’s Mac as a comma-delimited text file. From there, the data gets “fed” to the template via an AppleScript, InData grabs it, and the magic happens.
We’ll cover the building of this script, along with a few other items, and wrap everything up neatly in Part 3, “Closing The Deal.”
0 Comments