

Closing The Deal
WELCOME TO PART 3 of our “Extreme Ad Makeover” trilogy, and thanks for sticking with us as we wrap up this tutorial. In Part 1 we showed off the finished product, and then covered some tips, techniques and best practices for preparing the InDesign ad template. Then in Part 2, we deconstructed the InData prototype to show that, in spite of how intimidating all that code might appear, it’s really not all that more complicated than your typical mail merge.
Now we’re going to close the deal (and abandon these real estate analogies for good) by examining the AppleScript that makes this all happen with just a few clicks. To be clear, you don’t need to create an AppleScript to use InData; you simply use InData’s “Import from File…” command and point it to the file containing your data. I mentioned Excel files in Part 2, which you absolutely can use for this purpose; you just need to save them as comma or tab-delimited text first in order for InData to recognize them.
So as long as your data is in the proper format, and your prototype is set up such that the fields that make up your <<fields… statement match the fields in your data—in order—the AppleScript portion of this tutorial is more or less optional. Because our data comes from Google Sheets files, which are saved by the designer as .csv files from the Google Cloud, and because we need to “massage” this data just a tad before importing, I decided to create an AppleScript only so that we could accomplish this all in one fell swoop, as they say.
When working with textual data in AppleScript, my go-to program is BBEdit from Bare Bones Software, a very flexible and powerful text editor whose long-time tag line, “It doesn’t suck,” is apparently now a registered trademark. You go, Bare Bones. It’s free to download and—fortunately for us—fully Apple-scriptable. Here’s the chunk of the script that uses BBEdit to do some cleanup chores on the CSV file:
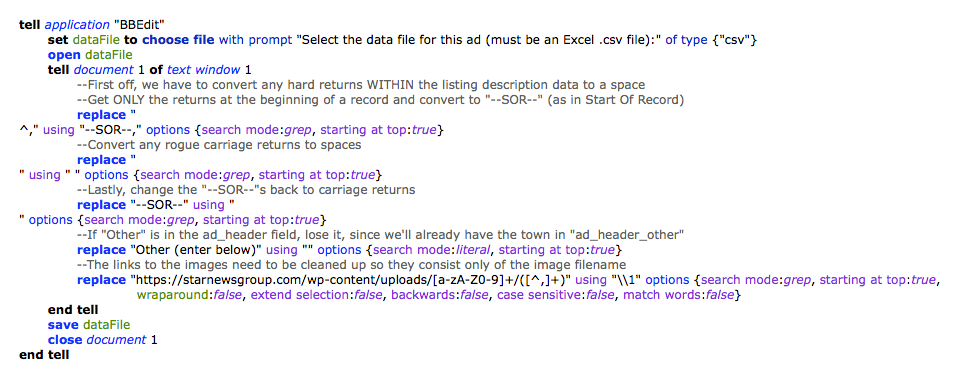
Even if you’ve never seen an AppleScript before, much less created one, the syntax is pretty straightforward. This portion of the script is simply requesting the data file with the real estate listings, then running some find and replace sequences to get rid of blank lines, remove any paragraph returns that the agents might have entered into the description of the property, and delete the URL part of the property and agent images data, since InData needs only the filename to locate and import images.
OK, you caught me. That last search and replace step uses GREP syntax, which may or may not be familiar to you, but it’s there only because the images for this particular template are uploaded to a folder on the Web when the agency submits them, so the data file ends up including the entire URL for each image. If you’ve never tried to GREP anything (don’t worry, it’s legal in most states nowadays), you can learn more about the syntax here.
In addition to being totally AppleScript-able, BBEdit also happens to be recordable, meaning that you can open a new or existing text file in BBEdit, launch the Script Editor application from your Utilities folder, and then click the red Record button. Anything you do in that document will now be “recorded” in the Script Editor window as scripting commands, and become a working AppleScript. In fact, if memory serves I actually recorded this part of the script, because getting all those GREP options (the purple text in that script step) in place is easier when BBEdit writes them in for you.

So, in essence, we’re using a script that wrote itself to create an ad that builds itself. Is that not the greatest thing since sliced bread? Or at least the greatest thing since sliced bread got its own Super Bowl commercial, anyway.
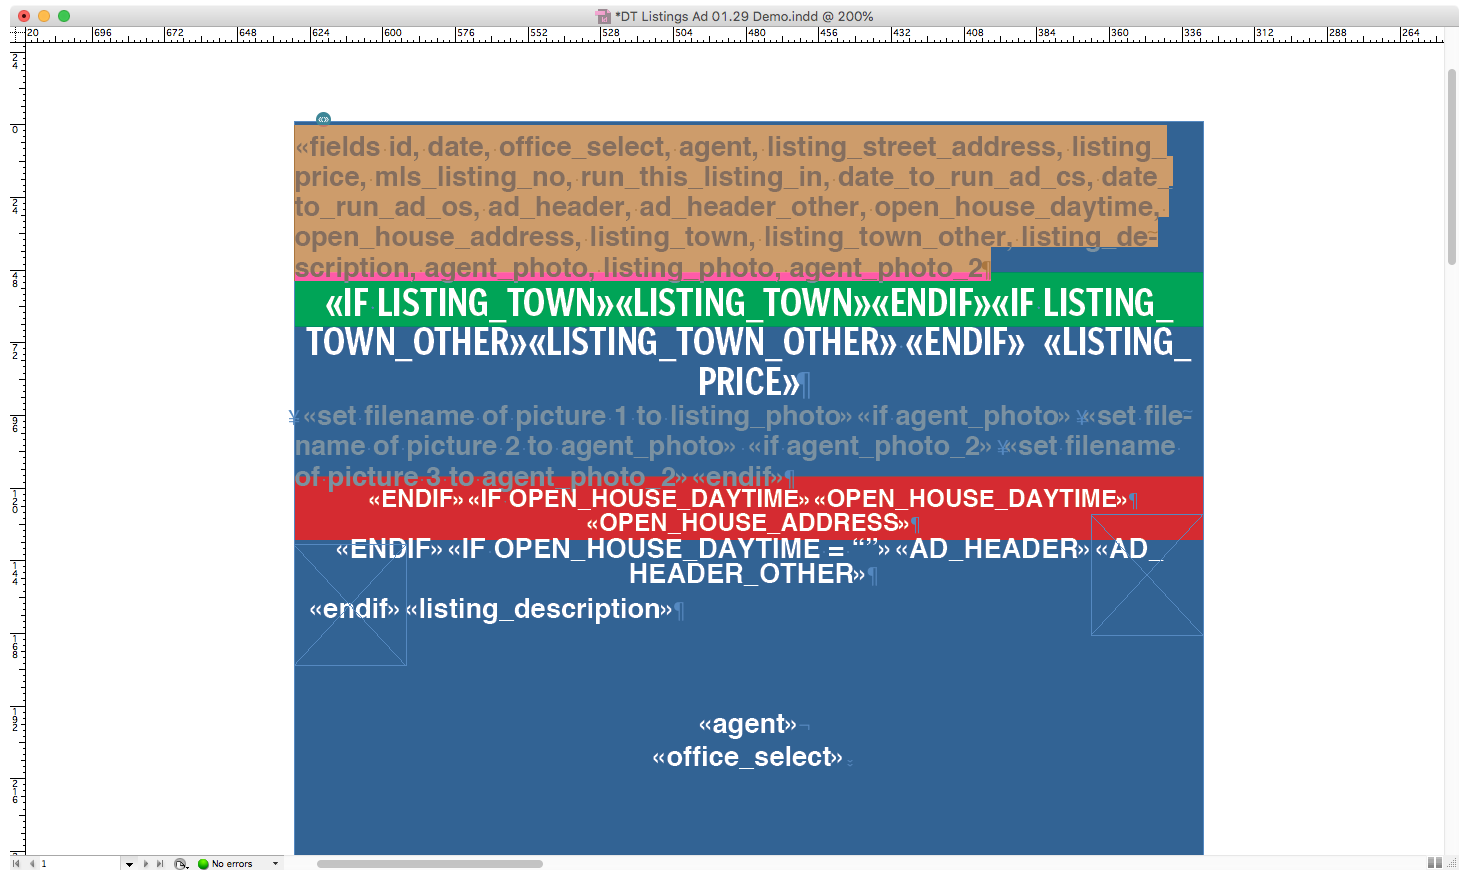
Now that the textual data has been cleaned up, let us proceed to the InDesign portion of our program. Here’s that chunk of the script, which admittedly is a bit longer than the BBEdit part but, again, very straightforward. The template for the ad is requested and opened, followed by a one-line directive that tells InData to import the data from the designated file, using the prototype on the pasteboard and flowing the imported text and images into the threaded text frames beginning with the first one.
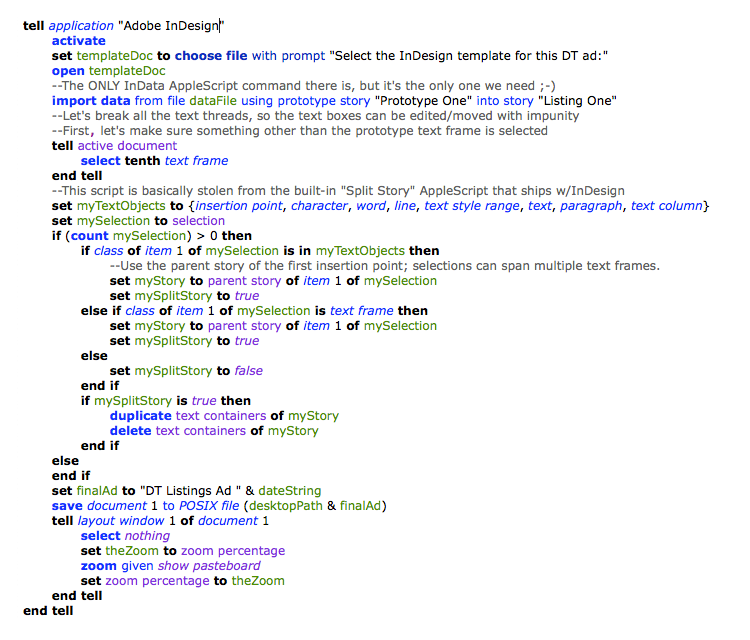
Ah, but how does InData know that our prototype is called “Prototype One,” and that the story we need it to start with is “Listing One”? Simple, as InData thoughtfully provides an option for designating the names of both prototypes and text frames (stories). This is found in the InData menu under “Name Story…” I suppose I could have conjured up some more compelling designations for these, but at the time I was simply worn out from writing all those non-recordable script steps.
Moving right along, the script then selects a random text frame (just to ensure that anything but the prototype on the pasteboard is selected) and invokes that “Split Story” script I’ve mentioned in both Parts 1 and 2 of this tutorial. This script actually ships with InDesign, which means I didn’t have to write it or record it, and exists solely to seek out all the threaded text frames and break those threads, so each frame can be dragged around on the layout when the realtor decides the first listing shall be the last, and the last shall be the first, or however that parable goes.
The last few lines name the file and save it to the desktop, then center the page in the window without changing the zoom level. That last little trick comes courtesy of an individual known only as “macgrunt,” who has quite a collection of InDesign scripting hints and tips on his/her Web site. It’s in our script only because I am nothing if not anal-retentive, and I wanted the document to be nicely centered in the window once the script finished.
Well… there it is, as Holy Roman Emperor Joseph II himself might have observed. Let’s sit back and enjoy the entire process from start to finish, including the data cleanup part that BBEdit handles for us. Even with that thrown in, the whole shebang is over almost before you can say “comma-delimited text file.”
And with that, we’re closing the deal on this real estate transaction. While this was by no means an exhaustive step-by-step tutorial, my hope is that you were inspired enough by what was presented here to consider automating an InDesign (or QuarkXPress) document yourself. To give you a head start, here are some useful links for the software and other info to which I’ve referred, along with the complete text of the InData prototype, some sample data, and the AppleScript used herein.
InData (demo version allows importing up to 50 records):
https://emsoftware.com/emdata
BBEdit
https://www.barebones.com/products/bbedit/
Mac OS Automation (great resource for all things AppleScript):
https://www.macosxautomation.com/applescript/resources.html
Adobe’s InDesign Support Forum (scripting-specific topics):
https://community.adobe.com/t5/indesign/bd-p/indesign?page=1&sort=relevance&filter=all&topics=label-scripting
The InData prototype and sample data used in this tutorial:
https://media.altimac.com/blog/prototype.zip
The AppleScript used in this tutorial:
https://media.altimac.com/blog/ad-builder.applescript
And, if I may be permitted one final real estate analogy here:
“DO try this at home.”
0 Comments